Creating Accessible Web Content in Dreamweaver
Introduction
Dreamweaver is a popular web authoring tool developed by Adobe. It is often used as a WYSISYG (What you see is what you get) editor, meaning it allows people to create web pages without spending as much time in the markup or code. This tutorial outlines how to create accessible web content in Dreamweaver.
Instructions are for the view in Dreamweaver CC 2014 or newer.
Page Title
A succinct, unique, and descriptive page <title> is very important for accessibility. Many users, especially screen reader users, rely on the page title to identify the contents on a page. When creating a new document, a dialog appears. Enter the page title into the field.
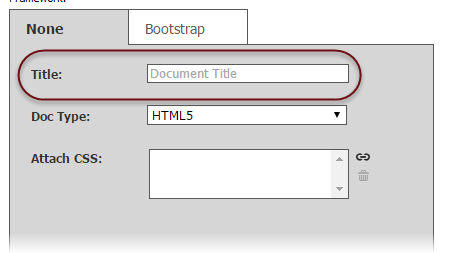
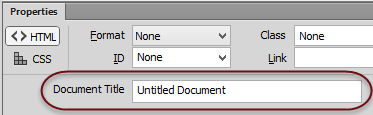
If you do not add a title when you create the page, it is given a generic <title> of "Untitled Document". You can change this in the field, in the document's panel at the bottom of the page.
If the panel is not visible, select .
Image Alternative Text
Every <img> element should have alternative text that presents the content or function of the image to screen reader users. To give an image alternative text, select the image and enter the alternative text in the field, located in the panel.
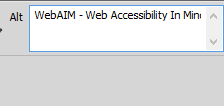
When you insert an image in Dreamweaver, by default it is given empty alternative text (alt=""). If the image is decorative, or if the alternative text of the image is provided in nearby text, then you can leave this field blank. Otherwise, make sure to add appropriate alternative text.
Form Labels
Most types of form elements (text boxes, text areas, checkboxes, radio buttons, etc.) need descriptive labels. When adding a form control to the page, Dreamweaver will automatically add a <label> element with generic text (e.g., "Text Field"). Update the label text so that it is unique and descriptive.
If the control is inserted while in the frame, only the form control will appear, not the label.
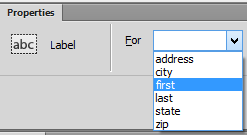
If the form control already has a text description that should be the label, select the label text and choose . Then go to the panel for the label, select dropdown menu, and choose the value that matches the id of the form control you want to label.
The <label> element cannot be used to provide multiple labels for a single form control or to associate a single label with multiple form controls. If your form control has more than one label (or vice-versa), see our article on advanced form labels.
If the label text is adjacent to the form control, select the text and form control and then insert the label. Dreamweaver will wrap a <label> tag around the text and the form. Do not add a for attribute to wrapped labels.
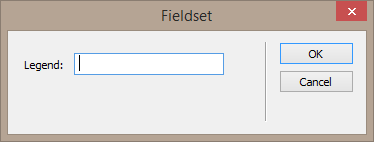
Fieldsets
The <fieldset> and <legend> elements provide a mechanism to add a higher-level label to a group of form controls. The <fieldset> identifies the entire grouping and <legend> identifies the grouping's descriptive text. This is often used for groups of radio buttons and checkboxes. To add <fieldset> and <legend> in Dreamweaver, highlight the group of elements and select . The selected content will be wrapped in a <fieldset> and a dialog will appear where you can enter the .
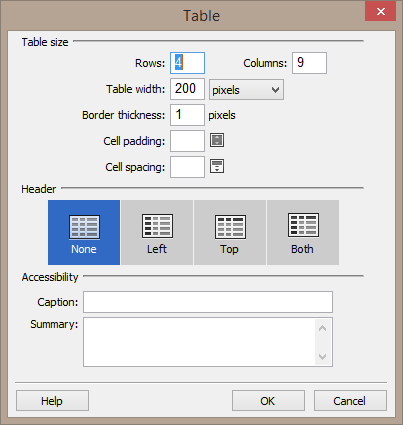
Data Tables
There are three principles involved in making data tables accessible to screen reader users:
- Designate table headers (
<th>). - Assign a
scopeto row and/or column headers. - If appropriate, give the table a <
caption>.
When inserting a table, a dialog box is presented. Under the options, choose whether the table has no headers (), row headers (), column headers (), or row AND column headers ().
Dreamweaver will designate table headers with the correct scope (e.g., <th scope="col">).
The dialog also has fields for a table , which presents a title or description of the table. While not all data tables need captions, they are often helpful. A table should typically be left blank—the summary attribute it is not well supported and is not part of the HTML5 specification.
- If the table is used for layout purposes (not recommended), select under the header options and do not add a .
- If you select under , then Dreamweaver will make the top-left cell a column header. If this cell is empty (and therefore not a header), click in this cell, and in the panel, uncheck the checkbox.
The only way to add the scope attribute to tables that already exist in your document is to add them manually in view. For complex tables which have headers that span rows or columns and for which scope is not sufficient, you must manually add headers and id attributes. If possible, simplify your tables so headers and id can be avoided.
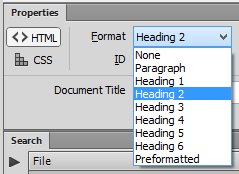
Headings
A logical heading structure greatly enhances the accessibility of a web page. Headings are often used by screen reader users for page navigation and orientation. To add headings to a page, select , and then select the desired heading level. To change text to a heading, or to change heading levels, select the text and select the desired heading level from the menu in the panel.
Links
When creating a link (), a dialog appears with several options.
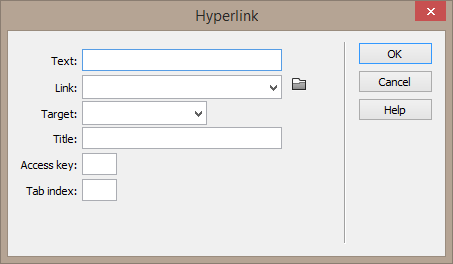
Add descriptive link text to the field. This text should clearly describe the destination or function of the link. Avoid ambiguous or extraneous text like "click here". The , , and fields should almost always be left blank.
Lists and Emphasized Text
Dreamweaver includes options in the panel to create unordered/bulleted lists (<ul>) or ordered/numbered lists (<ol>). You can also emphasize text (<strong> for bold and <em> for italics).
![]()
HTML5 Sectioning Elements
Dreamweaver allows you to create the following HTML5 sectioning elements (in the menu): , , , , , , and . Just like ARIA landmarks, these elements identify page regions that can help a screen reader user orient and navigate the page (with the exception of , which creates a generic <section> element).